Plaster
masks can give you something unique to wear to
any masquerade party! Molded to any shape you
desire, you're only limited by your own
imagination.
You
will need:
plaster
bandages (found at drugstores or hospital
supply stores - used to use for casts)
large
sheet or tarp
vaseline
bowl
of water
scissors
scarf
or hairband to hold hair back
molding
paste
any
decoration to attach to mask while forming
acrylic
paints, hot glue gun, etc for decorating
You
will need at least two people for this project.
First, draw out ideas for your mask. You will
want to have an idea in mind before your start
forming the mask. Will you want a half mask or a
full mask? Will your mask be just the shape of
your face, or will you want to add horns, warts,
enlarged forehead or eyebrows? Will you want to
blend decorations like beads or feathers into
the mask while you're forming it? Have all items
handy so you don't have to search around for
them.
Spread
the sheet or tarp on the floor and have one
person lie flat in the center of it. You'll want
to be comfortable, since you'll be lying still
for a period of time. Wrap the hairband or scarf
around hair to hold it away from face. Vaseline
face thoroughly, especially eyebrows and edges
of hair. This will prevent the plaster from
sticking to skin or hair.
Cut
pieces of bandage to cover the largest areas of
skin first, the forehead and cheeks. Dip bandage
pieces in bowl of water and place on face,
smoothing out any wrinkles as you go. Fold/turn
under the edges of bandage that will be on the
outside of your mask. Do the chin next, and then
the nose, using smaller pieces to fit the
flattest areas of skin. Overlap pieces slightly,
adding smaller pieces to fill in the spaces.
Slowly and carefully build shape. Once you have
a solid base layer you can begin to form any
special shape you desire. If you'll be using
special decorations, place beads or jewels or
paper plates on the mask and secure with small
pieces of plaster. You can even completely cover
a piece of paper plate with plaster bandages.
The
subject will be able to feel the mask
contracting as it dries. You will want to keep a
wet washcloth handy to moisten the mask if it
gets too dry too quickly. Be careful not to get
plaster in the subject's eyes. If you'll be
creating a full face mask, you might want to
give them a straw to breath through.
For
people who tend toward claustrophobia, we
recommend only doing half-masks, and children
under 5 probably won't be able to sit still long
enough for this project.
When
the mask feels sturdy (the subject will begin to
feel itchy as it hardens), pull it gently off
and set aside to dry fully. The mask is still
fragile at this point, so don't handle it too
much.
Once
the mask is fully dry, you can finish smoothing
it. Use a light layer of molding paste (found at
art stores) to smooth out bumps and ridges. Once
this dries, finish decorating your mask. Paint
with acrylic for color. Attach decorations such
as feathers, fur, jewels with hot glue.
To wear your mask, poke two holes near temple
and attach elactic or string and tie at the back
of your head. (You may need four holes,
depending on how heavy the mask is.) If your
full-face mask makes your face sweat and itch,
try powdering your face, or line the inside of
your mask with thin cotton fabric.
Your
mask can express a part of your personality - if
you have the patience, try holding a facial
expression like a grimace, frown, or open
mouthed scream while forming your mask.
Have
fun!
Mardi
Gras Mask for Kids
Materials
needed: · Different
colored paints · Glitter · Popsicle stick
(one for each mask) · Construction
paper · Glue · Scissors · Feathers,
pom-poms, beads, glitter, and other decorative
materials
What
to do:
Step
One: Holding the construction paper
horizontally, trace and cut out a long
"figure eight." This is the shape of
the mask.
Step
Two: Trace and cut out two eyeholes.
Step
Three: Now your child can start decorating her
mask. Encourage her to be as creative as she
can, using paint, feathers, etc.
Step
Four: Set the mask aside to dry and paint the
popsicle stick.
Step
Five: When the paint is dry, glue the stick to
the edge of the mask. This is the handle.
Now
it's party time! Serve up some gumbo, jambalaya,
and cornbread.
Don't
forget to decorate! The traditional Mardi Gras
colors represent justice (purple), faith
(green), and power (gold). Use streamers,
balloons, and confetti in these colors to create
a carnival atmosphere.


 Cut
pieces of bandage to cover the largest areas of
skin first, the forehead and cheeks. Dip bandage
pieces in bowl of water and place on face,
smoothing out any wrinkles as you go. Fold/turn
under the edges of bandage that will be on the
outside of your mask. Do the chin next, and then
the nose, using smaller pieces to fit the
flattest areas of skin. Overlap pieces slightly,
adding smaller pieces to fill in the spaces.
Slowly and carefully build shape. Once you have
a solid base layer you can begin to form any
special shape you desire. If you'll be using
special decorations, place beads or jewels or
paper plates on the mask and secure with small
pieces of plaster. You can even completely cover
a piece of paper plate with plaster bandages.
Cut
pieces of bandage to cover the largest areas of
skin first, the forehead and cheeks. Dip bandage
pieces in bowl of water and place on face,
smoothing out any wrinkles as you go. Fold/turn
under the edges of bandage that will be on the
outside of your mask. Do the chin next, and then
the nose, using smaller pieces to fit the
flattest areas of skin. Overlap pieces slightly,
adding smaller pieces to fill in the spaces.
Slowly and carefully build shape. Once you have
a solid base layer you can begin to form any
special shape you desire. If you'll be using
special decorations, place beads or jewels or
paper plates on the mask and secure with small
pieces of plaster. You can even completely cover
a piece of paper plate with plaster bandages.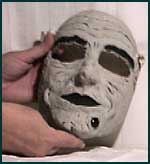 To wear your mask, poke two holes near temple
and attach elactic or string and tie at the back
of your head. (You may need four holes,
depending on how heavy the mask is.) If your
full-face mask makes your face sweat and itch,
try powdering your face, or line the inside of
your mask with thin cotton fabric.
To wear your mask, poke two holes near temple
and attach elactic or string and tie at the back
of your head. (You may need four holes,
depending on how heavy the mask is.) If your
full-face mask makes your face sweat and itch,
try powdering your face, or line the inside of
your mask with thin cotton fabric.