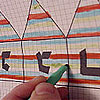
Purchase a pre-printed pattern of
Hebrew letters, then stencil on graph paper.
Color the printed pattern with
colored pencils, crayons or markers to determine the design.
Make solid colored panels, blocks of color, stripes – it's
limited only by your imagination.
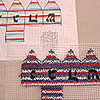
Stitch as designed using your
favorite needlepoint stitches. This design features a simple
counted cross-stitch technique, working on one row at a time.
Continue to stitch until the design is
filled in on the canvas as indicated by the pattern.
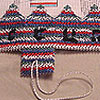
Cut around the perimeter
of the stitched design, being careful not to cut the
needlepoint then thread a loop of decorative braid, cord or
ribbon into the center of the indicated square (the one
without a letter design) to fashion a handle for the dreidel.
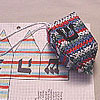
Fold the needlepoint cutout
into dreidel shape and stitch the sides together using a
blanket stitch to secure . If you stitched separate panels,
line them up and place the bottom square with the loop handle
in the center, then position the one of other four squares on
each side of it. Secure with blanket-stitching. Stitch the
four triangles together to form the top of the dreidel then
connect the squares and triangles together.
Precautions:
There are a variety
of needlepoint canvases and threads on the market. This dreidel
was made using five-count plastic canvas, acrylic needlepoint yarn and
metallic cord. It was stitched as a single unit, then folded and sewn
together. The plastic canvas makes this dreidel functional, but the
performance could be improved by stitching each panel seperately then
sewing all the components together without using the folding
technique.
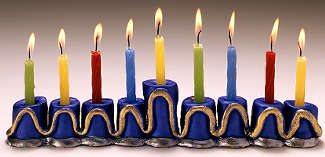
Homemade
Hanukkah Menorah
Families use a special, nine-pronged
candelabra, called a menorah or hanukkiah, to light candles
every night for the eight nights of Hanukkah. The ninth
candle, which stands higher than the others, is the shammash
or servant candle. It is used to light the other candles (so,
technically, you light two candles on the first night, three
on the second night and so on). It is customary for the
candles to be placed in the menorah from right to left and lit
from left to right. Making a menorah from self-hardening clay
is an easy, fun project for kids to try. When it is complete,
set the menorah on a windowsill for all to admire.
MATERIALS
Self-hardening clay, about 1 1/2 lbs.
Ruler
Butter knife
Hanukkah candles
Sheet of sturdy cardboard
Paintbrushes
Acrylic paint in assorted colors
On a clean work surface, roll the clay into
a long cylinder with an even diameter of a little over an
inch. Then, measure the cylinder and mark off 10 even lengths
(about 1 1/2 inches each). Cut eight of these lengths, and
leave the last two uncut (these will be the taller shammash).
Cylinders may flatten when cut; gently reshape them if
necessary. Using a Hanukkah candle, make a hole in one end of
each cylinder, deep enough to hold a lighted candle. Again,
reshape gently.
On the cardboard base, line up the cylinders
side by side with the one for the shammash in the center.
Gently press the sides of the cylinders together, using water
to make them stick (some separation may occur when the menorah
dries).
To decorate your menorah, roll out a thin
coil of clay to twine around the bottom or sides.
Alternatively, you can try adding stars or other clay shapes.
To help clay decorations adhere to the menorah, brush both
surfaces with water before attaching. Let the finished menorah
dry for two or three days, then paint it in bright colors.