Materials:
1 long-sleeved pink/white polo shirt or long-sleeved pink/white leotard,
1 pair of pink/white tights,
1 yard of pink/white felt,
3 pipe cleaners,
STICKY BACK® brand tape or coins,
2 yards of iron-on backing material (interfacing),
1 package of silver gems of silver glitter,
white fabric glue,
white thread, scissors, pins, tape measure
Instructions:
Iron backing material to felt. Using brown wrapping paper, make a wing pattern
in shape shown below. Enlarge pattern size as necessary to proportionately fit
child. Cut front and back, left and right wings of felt and interfacing. Fuse
the iron-on backing to front and back, left and right wings. With backing sides
together, glue or stitch felt wings together. Also, glue or stitch left and
right wings together at the narrow flap to make the wings into one piece.
Separate the two halves of the STICKY BACK® tape. Apply the hook half of three
3" strips of VELCRO® brand STICKY BACK® tape or coins about 1/2"
apart to the narrow flap that forms the center back of the wings. Apply the loop
side of the VELCRO® tape or coins to the back center of the polo shirt; press
VELCRO® strips together to fasten wings onto polo shirt. Decorate wings and
headband with silver gems secured with VELCRO® brand coins. Add glitter in a
random design for extra sparkle.
Skirt: Additional Materials
2 pieces of white tulle - 72" X 18", for bottom layer of skirt,
2 pieces of irridescent white lame - 72" X 18", for middle layer of
skirt,
2 pieces of white-and-gold/silver patterned netting - 72" X 18", for
top layer of skirt,
1/8 yard white satin, for waistband,
3/4 yard VELCRO® hook and loop tape,
1 yards gold/silver sequins for trimming,
Instructions: To make the waistband, measure the child's waist and cut
a piece of satin to waist measurement, plus 4". Cut the waistband piece as
follows: Waistband Piece = wiastline size + 4" long X 4" wide. Layer
skirt fabrics as follows: white tulle on bottom, irredescent fabric in middle,
and white/gold or silver netting on top. Keeping the long straight edges even,
stitch two rows of machine basting along the straight edge. Pull basting
stitches to gather the skirt. With right sides together, pin the skirt to one
long edge of waistband, beginning and ending 1/2" from each end of
waistband. Stitch in place and remove pins. Fold the waistband in half,
lengthwise, with right sides together, and stitch the short ends. Turn the
waistband to right side and slipstitch the remaining long edge in place over
waistband seam allowance. Stitch a 4" piece of hook and loop tape to each
end of the waistband. Glue the sequins to the waistband for trimming.
Headpiece: Cut a piece of felt 2" wide to the length of the
circumference of the child's head plus 2" for the overlap. Use STICKY BACK®
brand tape or coins to fasten headband.
Halo: Bend two pipe cleaners to form a circle and twist ends. Use one
pipe cleaner to connect halo circle to head band at back. Secure to headband
using a VELCRO® brand tape or coin.
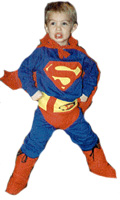
Create a Superman emblem (see photo) on paper using the pencil and ruler.
Cut out the emblem.
Trace the emblem twice on red fabric or felt. Cut out both emblems. Note:
Second emblem is for use on the cape.
Iron-on Wonder-Under to backside of emblems. Let cool.
Remove paper backing.
Iron-on to yellow fabric or felt. Let cool.
Cut around outside of emblems.
I appliqued around edges for durability.
I safety pinned the emblem to his sweatshirt so he could use the shirt
after Halloween and I could save the "S" for a future child
without putting size limitations on the costume.
Cape:
My first thought when doing the cape was to make it long. I did
this so that he could continue to use it when he got older. He was three in the
photo and now at almost six it still fits well.
Note: There's a tie around the collar of the cape. YES collar. I put a 2 inch
collar so that the cape would stay up on his shoulders and not sag and hang
from his throat. If I had it to do over I would extend the collar into the
ties and use Velcro. That way if someone pulled on the back of the cape and it
would come apart easily and not choke anyone. We've had no problems in that
area though.
Cut out a piece of red fabric or felt to use for the cape. Make the fabric
to fit from the outside edge of the shoulder to the opposite edge of the
shoulder and to the length desired. Be sure to add the 2" collar.
Sew the second emblem on the cape.
Sew Velcro on the ties of the cape.
Snow Boots:
I took his snow boots and laid them on red fabric. I traced about 3/4 of
an inch away and about 3 inches taller.
Cut out 4 of this pattern.
Match two pieces together and sew the sides only.
I clipped the curves (very important) and then put them over the boot,
folding the extended top down into the inside of the boot once it was on his
foot.

 in shape shown below. Enlarge pattern size as necessary to proportionately fit
child. Cut front and back, left and right wings of felt and interfacing. Fuse
the iron-on backing to front and back, left and right wings. With backing sides
together, glue or stitch felt wings together. Also, glue or stitch left and
right wings together at the narrow flap to make the wings into one piece.
Separate the two halves of the STICKY BACK® tape. Apply the hook half of three
3" strips of VELCRO® brand STICKY BACK® tape or coins about 1/2"
apart to the narrow flap that forms the center back of the wings. Apply the loop
side of the VELCRO® tape or coins to the back center of the polo shirt; press
VELCRO® strips together to fasten wings onto polo shirt. Decorate wings and
headband with silver gems secured with VELCRO® brand coins. Add glitter in a
random design for extra sparkle.
in shape shown below. Enlarge pattern size as necessary to proportionately fit
child. Cut front and back, left and right wings of felt and interfacing. Fuse
the iron-on backing to front and back, left and right wings. With backing sides
together, glue or stitch felt wings together. Also, glue or stitch left and
right wings together at the narrow flap to make the wings into one piece.
Separate the two halves of the STICKY BACK® tape. Apply the hook half of three
3" strips of VELCRO® brand STICKY BACK® tape or coins about 1/2"
apart to the narrow flap that forms the center back of the wings. Apply the loop
side of the VELCRO® tape or coins to the back center of the polo shirt; press
VELCRO® strips together to fasten wings onto polo shirt. Decorate wings and
headband with silver gems secured with VELCRO® brand coins. Add glitter in a
random design for extra sparkle.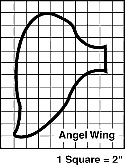 Instructions: To make the waistband, measure the child's waist and cut
a piece of satin to waist measurement, plus 4". Cut the waistband piece as
follows: Waistband Piece = wiastline size + 4" long X 4" wide. Layer
skirt fabrics as follows: white tulle on bottom, irredescent fabric in middle,
and white/gold or silver netting on top. Keeping the long straight edges even,
stitch two rows of machine basting along the straight edge. Pull basting
stitches to gather the skirt. With right sides together, pin the skirt to one
long edge of waistband, beginning and ending 1/2" from each end of
waistband. Stitch in place and remove pins. Fold the waistband in half,
lengthwise, with right sides together, and stitch the short ends. Turn the
waistband to right side and slipstitch the remaining long edge in place over
waistband seam allowance. Stitch a 4" piece of hook and loop tape to each
end of the waistband. Glue the sequins to the waistband for trimming.
Instructions: To make the waistband, measure the child's waist and cut
a piece of satin to waist measurement, plus 4". Cut the waistband piece as
follows: Waistband Piece = wiastline size + 4" long X 4" wide. Layer
skirt fabrics as follows: white tulle on bottom, irredescent fabric in middle,
and white/gold or silver netting on top. Keeping the long straight edges even,
stitch two rows of machine basting along the straight edge. Pull basting
stitches to gather the skirt. With right sides together, pin the skirt to one
long edge of waistband, beginning and ending 1/2" from each end of
waistband. Stitch in place and remove pins. Fold the waistband in half,
lengthwise, with right sides together, and stitch the short ends. Turn the
waistband to right side and slipstitch the remaining long edge in place over
waistband seam allowance. Stitch a 4" piece of hook and loop tape to each
end of the waistband. Glue the sequins to the waistband for trimming.