|
|
1.
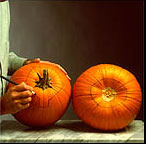
Cut Lid or Bottom
Don't try to cut a
perfectly round top. Chances are, you won't be able to figure out
where it lines up, and it will probably just fall in! Instead, draw a
six-sided lid (hexagon) on top of your pumpkin, big enough so you can reach in and clean out all the
pumpkin gunk. Angle the knife toward the center of the pumpkin to
create a ledge that supports the lid.
|
 |
2.
Clean and Scrape
Using a flat-edged ice cream scoop,
clean out the seeds and strings. It is important to scrape the inner
wall of the pumpkin, so that it is no more than 1 inch thick. You can
check the thickness with a pin or poker. This process usually take
15-20 minutes. Where you plan to carve, scrape the
pumpkin wall until it’s about one inch thick.
|
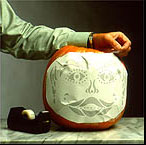 |
3.
Attach Pattern
Attach the pattern to the pumpkin with tape or straight
pins. Trim away the excess paper from the pattern with scissors. If you use pins,
place them on the design lines so you don’t end up with holes you
don’t want!
|
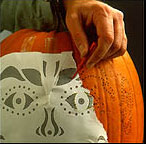 |
4.
Transfer Design
Using the Poker, poke holes about 1/16" to 1/8"
apart along design lines. Do not push poker all the way into the
pumpkin. Use just the tip to poke through the paper and outer pumpkin
skin. Check to see that all the lines have been transferred, then remove
the pattern. The more detailed the design, the closer together the dots
should be. This process can take up to 30 minutes.
|
| 

|
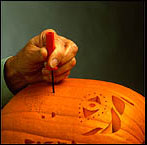
5.
“Saw” Design
Drill holes before carving (if needed). Push the very tip
of the Drill through the pumpkin skin. Then hold the drill near the end
and, with gentle pressure, begin twisting the drill into the pumpkin.
Keeping the drill at a 90 degree angle, grasp the handle and continue
turning until the hole is complete. The poker can be used as a drill by
pushing it all the way into the pumpkin. Using slender carving saws, saw dot-to-dot using a gentle
up and down motion. Don't "cut" or slice it like
a knife. Hold the tool like a pencil. Holding the pumpkin in your lap,
push the blade into pumpkin or, if necessary, rock it gently forward and
back to insert it. Saw steadily with a continuous up-and-down motion.
Only gentle forward pressure is needed. Depending on the complexity of
the design, this step may take 30-45 minutes. Work
from the center of the design outward to avoid putting pressure on areas
already carved.Don't bend
or twist the tool, try to make the cuts straight into the pumpkin. To
make sharp corners, always remove the tool and re-insert it at another
angle. Push cut pieces out from the inside, with your finger. To remove
large pieces more easily, cut them into smaller pieces first. Before
placing a candle inside, first cut a hole in the bottom, the same
diameter (size) of the candle. The Candle/Vent Drill is specially
designed to allow you to tip the pumpkin on its side to light. You won't
burn your fingers, and your candle will be less likely to tip over after
its lit. If you have cut the bottom off, then all you need to do is
place a candle on a plate, and set your lantern over it.One
last step before you are done. How many times has your pumpkin turned to
mush, or the lid has fallen inside? That's because you've actually
cooked your pumpkin from the inside out! Using the small end of the
Candle/Vent Drill, drill vent hole in the top (or lid) of your pumpkin.
This will allow most of the heat to escape and make your Jack-O-Lantern
last much longer.
|